- Published on
Window, Volume and Space
- Authors

- Name
- Xu Chi (xChester)
- @xchester16
Introduction
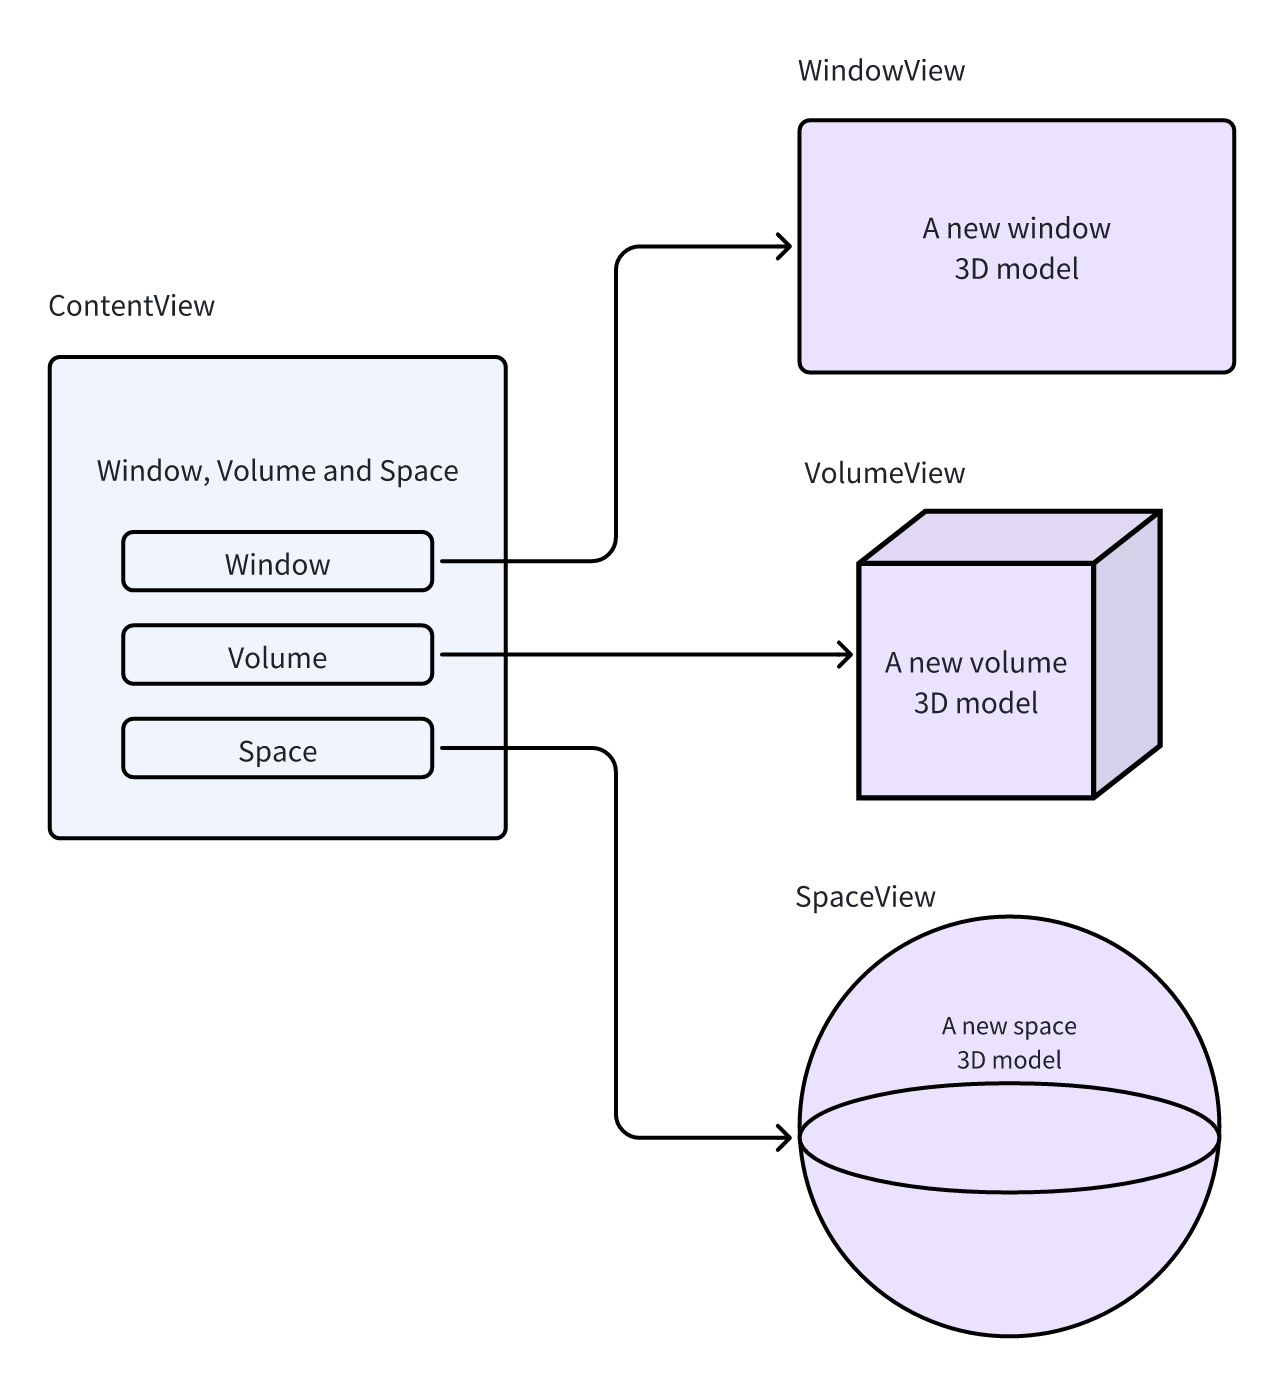
As a spatial computing operating system, visionOS provides 3 basic building blocks to present contents: window, volume and space. We're more familiar with windows which serves as basic elements in laptops or phones. While volumes and spaces are brand new, which are perfect for demostrating 3D contents.
Understand the concepts
Windows are more like traditional views. But in visionOS, you can add 3D objects to it.
Volumes is by default a 3D view which can showcase 3D content using RealityKit or Unity, creating experiences that are viewable from any angle.
Spaces is a more immersive space. There are two types of spaces: Shared Space and Full Space. By default, apps launch into the Shared Space, where they exist side by side — much like multiple apps on a Mac desktop. An app can also open a dedicated Full Space where only that app’s content will appear.
To understand these three concepts clearly, we would like to construct an application that includes a navigation page with three buttons, each used to open different building blocks.

Window
WindowView is a view of the Window type, which is a regular SwiftUI View. To add 3D objects to it, the following steps are needed:
Add USDZ type model files to the project.
Reference the model file using the Model3D method in RealityKit.
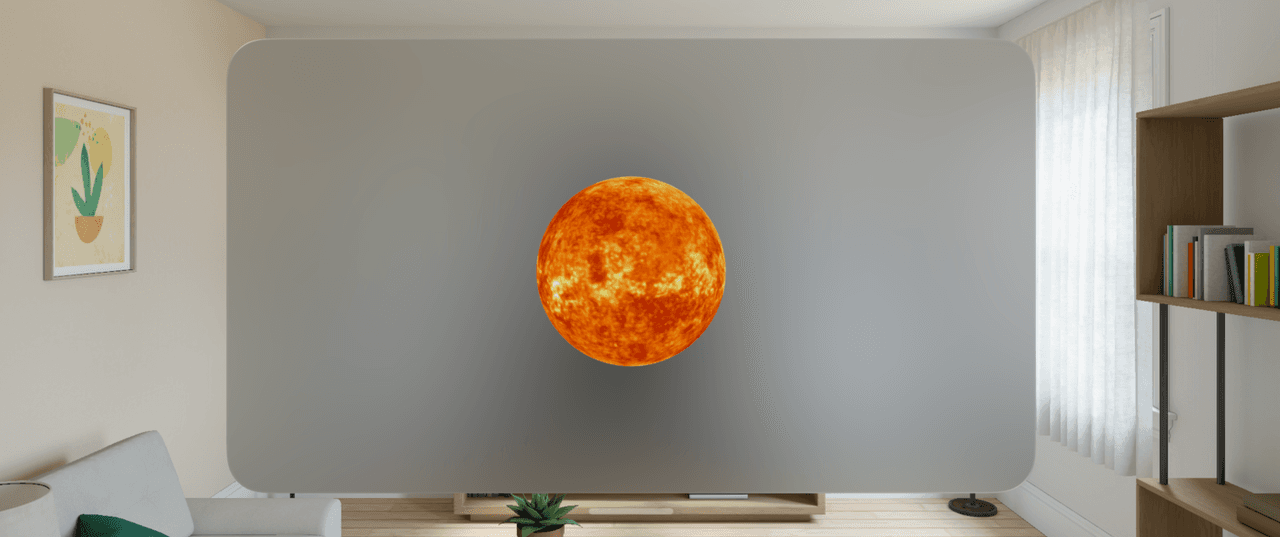
With below code, you can see a model of the sun suspended above the window in the preview.
struct WindowView: View {
    var body: some View {
        Model3D(named: "Sun")
    }
}

In the App file, add a new WindowGroup and assign it an ID.
@main
struct SunApp: App {
    var body: some Scene {
        // ...

        WindowGroup(id: "windowView") {
            WindowView()
        }
    }
}
This way, we have defined a basic Window.
Volume
A Volume is also a type of Window, and its definition in the View is the same. The only difference is that within the App's WindowGroup, you need to declare its Window style as .volumetric using a modifier.
@main
struct SunApp: App {
    var body: some Scene {
        // ...

        WindowGroup(id: "windowView") {
            WindowView()
        }

        WindowGroup(id: "volumeView") {
            VolumeView()
        }.windowStyle(.volumetric)

        // ...
    }
}
Space
When defining a Space, you can use RealityView to load the scene, and load objects within the subsequent closure.
struct ImmersiveView: View {
    var body: some View {
        RealityView { content in
            // Add the initial RealityKit content
            if let scene = try? await Entity(named: "Immersive", in: realityKitContentBundle) {
                content.add(scene)
            }
        }
    }
}
In the App, you can add Views through ImmersiveSpace.
@main
struct SunApp: App {
    var body: some Scene {
        // ...

        ImmersiveSpace(id: "immersiveView") {
            ImmersiveView()
        }
    }
}
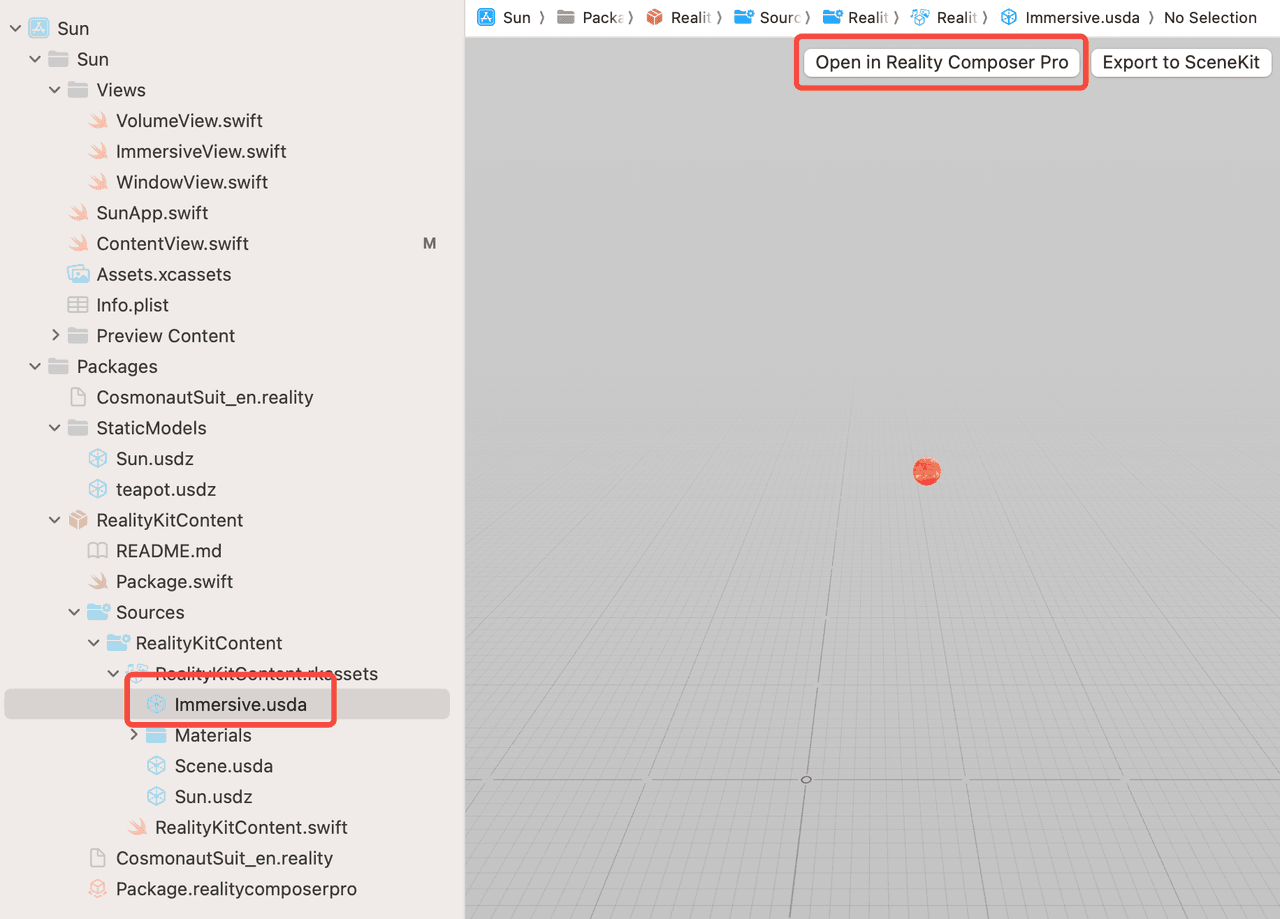
In Reality Composer Pro, we can edit the scene "Immersive", import models, and modify their positions through transform. When the Space is opened, it will be loaded according to the set scene.

In this way, we have completed the construction of three types of scenes.
Navigation page
In the navigation page, we need three buttons, each of which can open and close the corresponding View. To achieve the on/off functionality with a single button, you can use the Toggle in SwiftUI.
Toggle is a control that toggles between on and off states.
@State private var vibrateOnRing = true

var body: some View {
    Toggle(
        "Vibrate on Ring",
        systemImage: "dot.radiowaves.left.and.right",
        isOn: $vibrateOnRing
    )
}
To open/close a Space with a button, you first need to define a Toggle:
- Create a new Toggle, define it as a button type using the
toggleStyle. - Declare a boolean variable
isImmersiveSpaceShown, bind it to theisOnof the Toggle control to store the current state of the toggle. - Register the action triggered by the user clicking the button through
onChange, which is to open/close the immersive space. This completes the definition of the button style and behavior.
struct ContentView: View {

    @State private var isImmersiveSpaceShown = false

    var body: some View {
        // ...

        Toggle("Space", isOn: $isImmersiveSpaceShown)
            .toggleStyle(.button)
            .onChange(of: isImmersiveSpaceShown) {
                // open/dismiss space
            }
    }
}
To open/close the Space when the user taps the Toggle, you need to obtain openImmersiveSpace action from the environment within the View using @Environment, which has the type OpenImmersiveSpaceAction.
The OpenImmersiveSpaceAction defines a method called callAsFunction(id:) with the following signature. Therefore, you can directly call this method by passing a specific id to open the designated immersive space. This method is asynchronous, and depending on whether the immersive space is opened or not when the method is called, the returned result will also be different. Here, we will temporarily ignore the result of the call.
@discardableResult
@MainActor public func callAsFunction(id: String) async -> OpenImmersiveSpaceAction.Result
Based on the above information, you can implement the opening and closing of the immersive space with the following code:
struct ContentView: View {

    @State private var isImmersiveSpaceShown = false
    @Environment(\.openImmersiveSpace) private var openImmersiveSpace
    @Environment(\.dismissImmersiveSpace) private var dismissImmersiveSpace

    var body: some View {
        // ...

        Toggle("Space", isOn: $isImmersiveSpaceShown)
            .toggleStyle(.button)
            .onChange(of: isImmersiveSpaceShown) { _, show in
                Task {
                    if show {
                        await openImmersiveSpace(id: "immersiveView")
                    } else {
                        await dismissImmersiveSpace()
                    }
                }
            }
    }
}
The implementation for opening and closing a Window is similar, but since openWindow and dismissWindow are synchronous, there is a slight difference.
struct ContentView: View {

    @State private var isVolumeWindowShown = false
    @Environment(\.openWindow) private var openWindow
    @Environment(\.dismissWindow) private var dismissWindow

    var body: some View {
        // ...

        Toggle("Volume", isOn: $isVolumeWindowShown)
            .toggleStyle(.button)
            .onChange(of: isVolumeWindowShown) { _, show in
                if show {
                    openWindow(id: "volumeView")
                } else {
                    dismissWindow(id: "volumeView")
                }
            }
    }
}
Conclusion
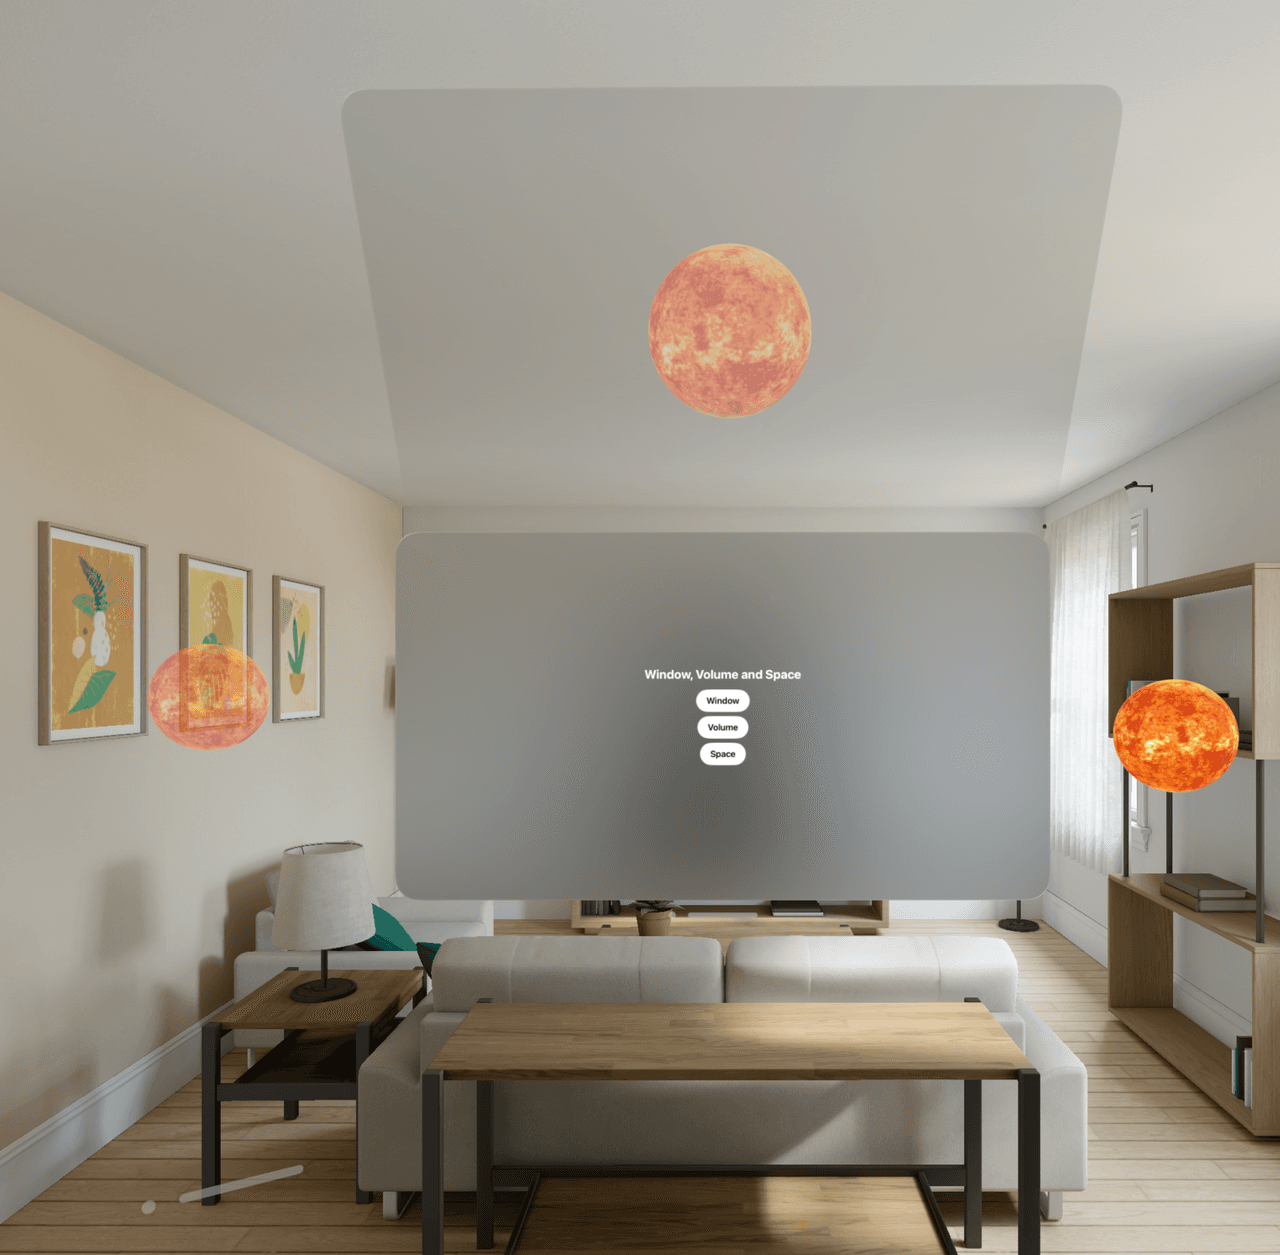
In this way, we can control the loading of the three types of building blocks through the page:
- Center: Navigation page
- Top: Window
- Left: Volume
- Right: Space (In the perspective view, objects are placed on the right side)
